
概述
Zend Framework (ZF) 是用 PHP 5 來開發web程式和服務的opensource框架,使用三層架構模式(Model-View-Controller,MVC) 架構,授權模式採用BSD許可證。ZF中的元件非常獨立,每個元件幾乎不依賴於其他元件。這樣的松耦合(use-at-will)結構可以讓開發者獨立使用元件。MVC的架構也非常適合團體開發,開發的元件並不會互相影響。ZF提供大量的module給你使用,它還提供連接Google, Yahoo, Flickr, Amazon…等Web Services的module。
Zend Framework特性包括
所有組件完全物件導向。
松耦合(Use-at-will)設計可以讓開發者獨立使用組件,每個組件幾乎不依賴其他組件。
默認提供了強壯而高效的 MVC 實現和基於PHP的模板。
支持多種資料庫,如MySQL,Oracle,IBM DB2,Microsoft SQL Server,PostgreSQL….等。
靈活的緩存機制,支持多種緩存方式,可以將緩存寫入內存或是文件系統。
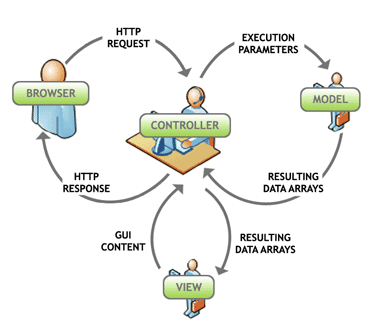
基本運作
鍵入網址->Controller->執行Action->回傳給View(顯示頁面)
Model: 可以reuse的物件,比如資料庫的名稱定義DbTable..等
View: 秀給使用者看的介面,副檔名皆為phtml,如,index.phtml
Controller: 負責使用者與系統之間的互動,例如Input及Output
系統需求
最新版本的Zend Framework要求PHP 5.2.4或是更高版本。Zend Framework 1.7.0前的版本要求PHP 5.1.4或是更高版本。官方提供的ZF手冊推薦使用PHP 5.2.3或是更高版本,因為新版本在編譯方面有許多重大安全和性能方面的改善和提高。
安裝
0. 環境:
Red Hat Linux 5.8
PHP 5.3.3
Apache 2.2.3
Zend Framework 1.11.12
1. 安裝RHEL (不說明)
2. 安裝php, apache,zend framework
I. 因為RHEL沒用正版,所以我使用centos的repo
# yum install php (這個安裝方式會安裝php5.2)
# yum install php53 (安裝5.3的方式,要try就安裝最新的stable版,所以我是安裝php5.3)
# yum install httpd (安裝repo中最新版就可以了,通常是2.2.3,記得先做yum update)
http://framework.zend.com/download/latest <-下載zend framework抓minimal或 full都可以
# cd /tmp
# tar xvf ZendFramework-1.11.12.tar.gz
# cd ZendFramework-1.11.12/
# cp -R library/* /usr/lib/php  //copy library到php的lib底下
# cp -R bin/* /usr/bin  //放在跟php binary同樣位置(通常為/usr/bin)。(只要移zf.sh和zf.php即可)
# chmod +x /usr/bin/zf.sh  //新增可執行的權限
# ln -s /usr/bin/zf.sh /usr/bin/zf  //可直接打zf
3. 安裝好測試有沒有成功
I.
# php –v
PHP 5.3.3 (cli) (built: Jun 27 2012 12:25:37)
Copyright (c) 1997-2010 The PHP Group
Zend Engine v2.3.0, Copyright (c) 1998-2010 Zend Technologies
II.
# zf show version
Zend Framework Version: 1.11.12
III.
# vi /etc/php.ini    //將zf的library路徑告知php
include_path = ".:/usr/lib/php:/usr/local/lib/php:/usr/lib/php/Zend"
IV.
# vi /etc/httpd/conf/httpd.conf //編輯apache config
LoadModule rewrite_module modules/mod_rewrite.so  //如果有#字號要拿掉
Listen 172.16.2.50:80		//可以自訂,通常是寫domain,沒domain寫ip
ServerName 172.16.2.50:80
DirectoryIndex index.html index.htm index.php //新增目錄檔直接讀取php
# /etc/rc.d/ini.d/httpd start //啟動apache
V.
# cd /var/www/html             //測試apache
# vi index.php

<?php phpinfo(); ?>     //貼上info function
VI. 瀏覽器打上http://172.16.2.50 看有沒有出現php info page
有下面這個圖示代表有撈到zend library
4. 建立ZF的基本架構,zf.sh可以幫我們建起基本的架構,如果對ZF架構很熟當然也可以自己mkdir就可以了
這裡我們用zf.sh來架就好了
# yum install php53-xml (我裝5.3才需要用php53,一般安裝用php-xml即可)
# /etc/rc.d/init.d/httpd restart
# cd /var/www/html/
# zf create project test //zf create project “project名稱”
# tree –d
|-- application
| |-- configs
| |-- controllers
| |-- models
| `-- views
| |-- helpers
| `-- scripts
| |-- error
| `-- index
|-- docs
|-- library
|-- public
`-- tests
|-- application
| `-- controllers
`-- library
可以看到ZF的基本架構已經建好了
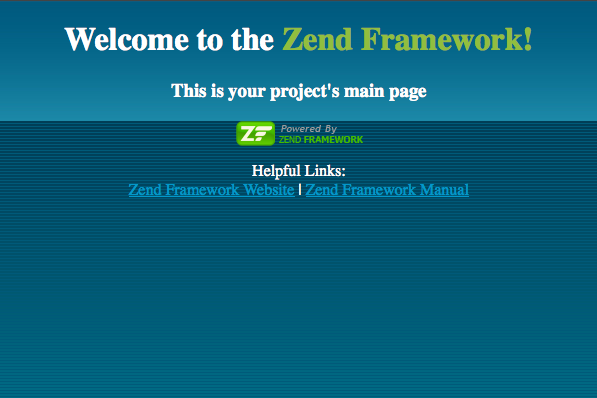
瀏覽器輸入172.16.2.50/test/public 就可以看到ZF產生好的頁面,就代表ZF運行沒問題
5. Apache virtual host
網址這樣172.16.2.50/test/public有點不方便,所以我們設定一下virtual host
這樣就可以直接透過172.16.2.50連到網頁了
# vi /etc/httpd/conf/httpd.conf

DocumentRoot "/var/www/html/test/public"
ServerName 172.16.2.50
# This should be omitted in the production environment
SetEnv APPLICATION_ENV development
<Directory "/var/www/html/test/public">
Options Indexes MultiViews FollowSymLinks
AllowOverride All
Order allow,deny
Allow from all
新增好後需要restart apache
Reference
- 透視Web MVC http://www.jaceju.net/blog/archives/167/
- ZF reference guide http://framework.zend.com/manual/zh/introduction.installation.html
- ZF WIKI http://zh.wikipedia.org/zh-tw/Zend_framework
- 初探 Zend Framework的View層 http://www.jaceju.net/blog/archives/1628/
- ZF Quick Start http://framework.zend.com/manual/en/learning.quickstart.intro.html
- Zend note http://notes.hubin411.com/zend_note.html